

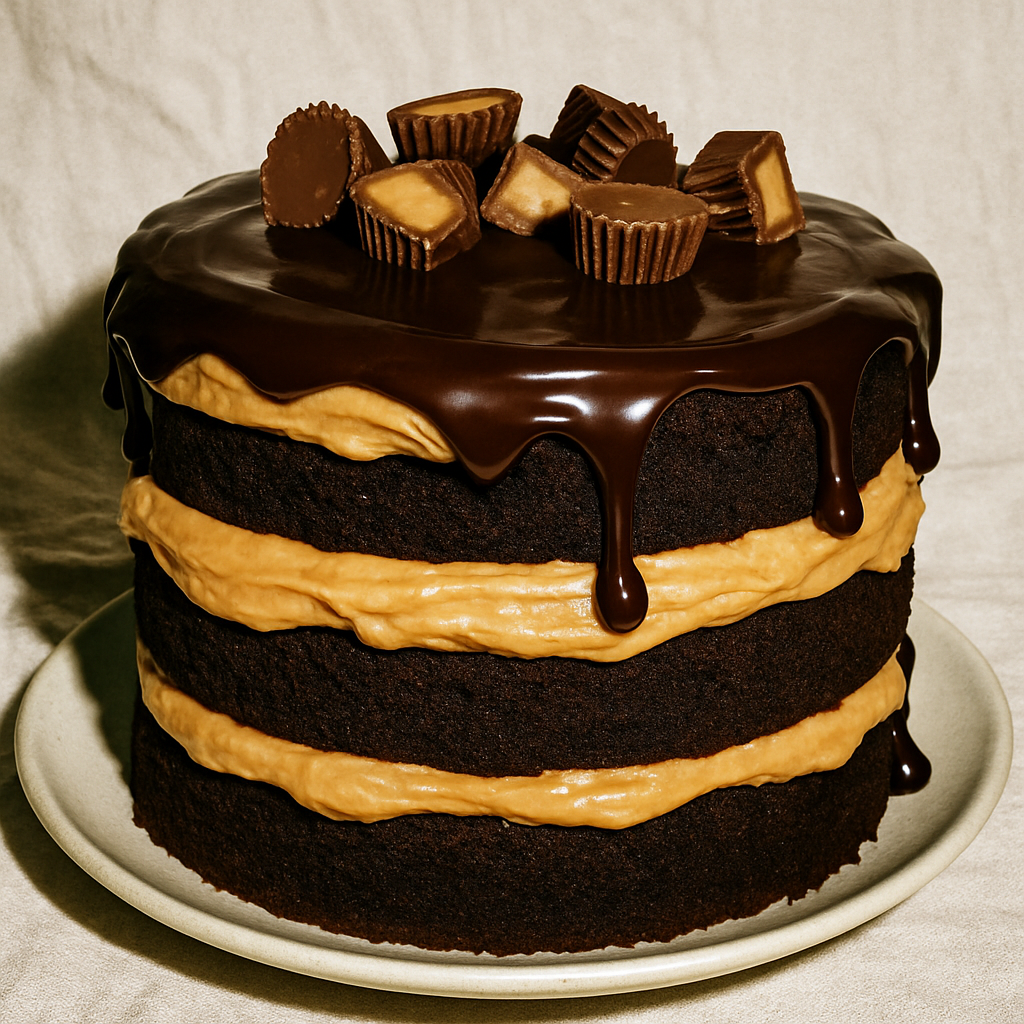
Prepare to be utterly enchanted by the ultimate dessert for anyone who adores the classic combination of peanut butter and chocolate: this magnificent Peanut Butter and Chocolate Fudge Cake! This isn’t just a cake; it’s a celebration of rich, moist chocolate fudge layers generously slathered with a creamy, dreamy peanut butter frosting, all crowned with a glossy chocolate ganache and adorned with delightful peanut butter cups. Every forkful is a symphony of intense chocolate and salty-sweet peanut butter, creating an indulgent experience that’s perfect for birthdays, special occasions, or simply to treat yourself and your loved ones to something truly extraordinary. Get ready for a show-stopping dessert that will leave everyone craving more!
Ingredients:
For the Chocolate Fudge Cake:
- 2 cups all-purpose flour
- 2 cups granulated sugar
- 1 cup unsweetened cocoa powder (Dutch-processed for darker color and smoother flavor)
- 2 teaspoons baking powder
- 1½ teaspoons baking soda
- 1 teaspoon salt
- 4 large eggs, at room temperature
- 1 cup buttermilk, at room temperature
- ½ cup vegetable oil (or other neutral-flavored oil)
- 2 teaspoons vanilla extract
- 1 cup hot coffee (freshly brewed, or 1 cup hot water with 1 tbsp instant coffee)
For the Peanut Butter Frosting:
- 1½ cups (3 sticks or 340g) unsalted butter, softened
- 4 cups (approx. 480g) powdered sugar (confectioners’ sugar), sifted
- 1 cup (240g) creamy peanut butter
- ½ teaspoon salt
- 2-4 tablespoons heavy cream, as needed
- 1 teaspoon vanilla extract
For the Chocolate Ganache Topping:
- 1 cup (approx. 170g) semi-sweet chocolate chips or finely chopped good quality chocolate
- ½ cup (120ml) heavy cream
For Decoration (Optional):
- 8-10 Peanut Butter Cups (mini or chopped full-size Reese’s cups)
Step-by-Step Instructions:
- Prepare the Chocolate Fudge Cake Layers:
- Preheat your oven to 350°F (175°C).
- Generously grease and flour two 8-inch round cake pans, tapping out any excess flour. You can also line the bottoms with parchment paper circles for easier removal.
- In a very large bowl, whisk together the dry ingredients for the cake: all-purpose flour, granulated sugar, unsweetened cocoa powder, baking powder, baking soda, and salt. Make sure there are no lumps.
- In a separate medium bowl, whisk together the wet ingredients (except coffee): eggs, buttermilk, vegetable oil, and vanilla extract until smooth.
- Add the wet ingredients to the dry ingredients and mix with a whisk or electric mixer on low speed until just combined. Do not overmix.
- Slowly pour in the hot coffee (it helps to bloom the cocoa and thin the batter) and mix until the batter is smooth and well combined. The batter will be quite thin; this is normal for fudge cakes.
- Divide the batter evenly between the two prepared cake pans.
- Bake for 30-35 minutes, or until a wooden skewer or toothpick inserted into the center of the cakes comes out clean with moist crumbs, but not wet batter.
- Let the cakes cool in their pans on a wire rack for 10-15 minutes before inverting them onto the wire rack to cool completely. Ensure they are completely cool before frosting.
- Make the Peanut Butter Frosting:
- In a large bowl, using an electric mixer (stand mixer with paddle attachment or hand mixer), beat the softened unsalted butter on medium-high speed until it’s light and fluffy, about 2-3 minutes.
- Gradually add the sifted powdered sugar, one cup at a time, beating until smooth after each addition. Scrape down the sides of the bowl as needed.
- Beat in the creamy peanut butter, salt, and vanilla extract until fully incorporated and smooth.
- With the mixer on low speed, add the heavy cream, one tablespoon at a time, until the frosting reaches your desired spreadable consistency. You might need 2-4 tablespoons. Beat on medium-high for another minute to make it extra fluffy.
- Make the Chocolate Ganache Topping:
- In a small microwave-safe bowl or a small saucepan, heat the heavy cream until it’s just about to simmer (small bubbles forming around the edges). Do not boil.
- Pour the hot cream over the chocolate chips (or chopped chocolate) in a heatproof bowl.
- Let it sit undisturbed for 2-3 minutes to allow the chocolate to melt.
- After 2-3 minutes, stir gently with a whisk or spatula, starting from the center and working outwards, until the ganache is completely smooth, glossy, and emulsified.
- Let the ganache cool slightly at room temperature, stirring occasionally, until it’s thick enough to set nicely on the cake but still pourable (it should take about 15-20 minutes, or longer if your kitchen is warm).
- Assemble the Cake:
- Once the cake layers are completely cool, place one chocolate cake layer onto your chosen serving plate or cake stand.
- Spread a thick, even layer of peanut butter frosting over the top of the first cake layer using an offset spatula.
- Carefully place the second cake layer on top.
- Apply a thin, even layer of peanut butter frosting all over the top and sides of the entire cake. This is called a “crumb coat” and it traps any loose crumbs.
- Refrigerate the cake for about 20-30 minutes to allow the crumb coat to set.
- Once the crumb coat is firm, apply a final, thicker, and smoother layer of peanut butter frosting to the top and sides of the cake. Smooth it out using an offset spatula or bench scraper for a neat finish.
- Decorate the Cake:
- Carefully pour the cooled (but still pourable) chocolate ganache over the top center of the frosted cake. Use the back of a spoon or an offset spatula to gently spread the ganache evenly to cover the top surface, letting some drip down the sides for a beautiful effect.
- While the ganache is still wet, arrange the peanut butter cups (whole mini cups or chopped full-size cups) artfully around the edge or over the top of the cake to complete the look.
- Allow the ganache to set slightly before slicing and serving. You can place it in the refrigerator for about 15-20 minutes to speed this up.
Tips, Variations, and Storage:
- Room Temperature Ingredients: Ensure your eggs, buttermilk, and butter for frosting are at room temperature. This helps create a smooth, emulsified batter and fluffy frosting.
- Coffee for Chocolate: Hot coffee enhances the chocolate flavor without making the cake taste like coffee. You can use hot water if you prefer, but the coffee really makes the chocolate sing!
- Don’t Overbake: Overbaking a chocolate cake can lead to dryness. Stick to the baking time and check with a toothpick.
- Sifting Powdered Sugar: Sifting powdered sugar for the frosting prevents lumps and ensures a super smooth consistency.
- Nutella Variation: For a hazelnut-chocolate twist, swap half of the peanut butter in the frosting for Nutella.
- Mini Chocolate Chips: You can sprinkle a handful of mini chocolate chips between the cake layers along with the frosting.
- Storage: Store the cake in an airtight container at room temperature for up to 2-3 days, or in the refrigerator for up to 5 days. If refrigerated, let it come to room temperature for about 30 minutes before serving for the best texture and flavor.
Pairings:
- Beverages: A tall glass of cold milk, a rich coffee, or even a dessert wine like a Port or Cabernet Sauvignon can complement this rich cake.
- Ice Cream: A scoop of vanilla bean ice cream or even peanut butter ice cream would be a luxurious addition.
Quick Info:
- Prep Time: 45 minutes
- Bake Time: 30-35 minutes
- Cooling Time: 1-2 hours (for cake layers)
- Assembly Time: 30-45 minutes (including chilling crumb coat)
- Total Time: Approximately 3-4 hours (mostly inactive cooling)
- Servings: 12-16 slices
- Cuisine: American / Dessert
- Effort Level: Medium (due to multiple components)