

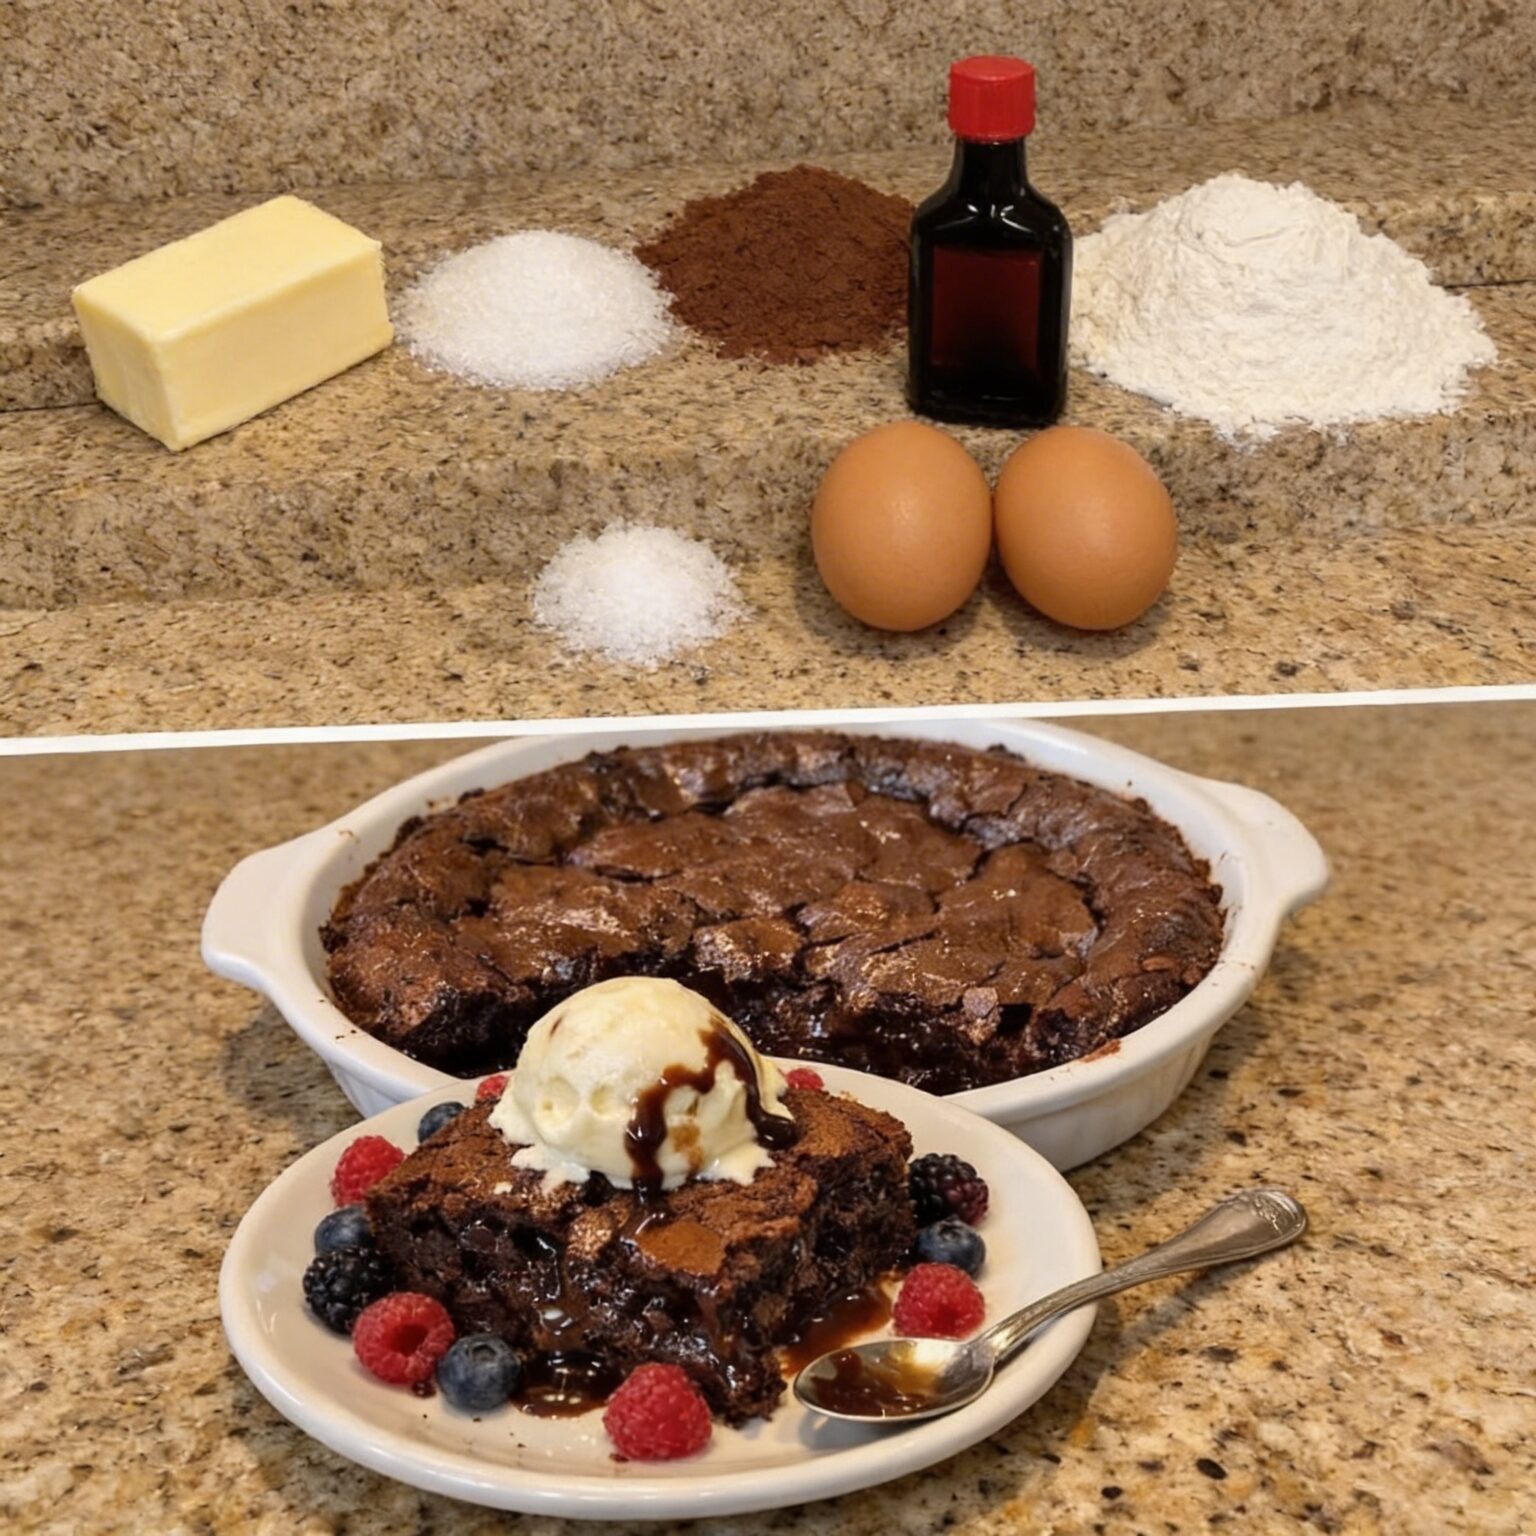
Prepare to indulge in the ultimate chocolate lover’s dream: a warm, gooey, and intensely fudgy Homemade Brownie Skillet, fresh from the oven! This dessert isn’t just a brownie; it’s an experience. Imagine a rich, dense chocolate interior with a delicate crackled crust, served warm in a rustic skillet, topped with a melting scoop of vanilla ice cream, and a burst of fresh berries. Every spoonful is a symphony of textures and temperatures – the warm, dark chocolate yielding to cool vanilla, all brightened by the tartness of the fruit. Perfect for sharing with friends and family, this comforting dessert is surprisingly easy to make and guaranteed to be the star of any gathering, turning a simple evening into a memorable treat.
Ingredients:
For the Fudgy Brownie Skillet:
- ½ cup (1 stick / 113g) unsalted butter, melted
- 1 cup (200g) granulated sugar
- 2 large eggs, at room temperature
- 1 teaspoon vanilla extract
- ½ cup (45g) unsweetened cocoa powder (Dutch-processed for richer flavor and color)
- ½ cup (60g) all-purpose flour
- ¼ teaspoon baking powder
- ¼ teaspoon salt
- Optional: ½ cup chocolate chips or chopped nuts (pecans, walnuts)
For Serving:
- Vanilla ice cream
- Fresh berries (raspberries, blueberries, blackberries)
- Optional: Chocolate syrup or caramel sauce for drizzling
Step-by-Step Instructions:
- Preheat Oven and Prepare Skillet:
- Preheat your oven to 350°F (175°C).
- Lightly grease an 8 or 9-inch cast-iron skillet, a ceramic baking dish (like the one pictured), or a round cake pan. If using a cast-iron skillet, ensure it’s well seasoned.
- Mix Wet Ingredients for Brownies:
- In a large mixing bowl, combine the melted butter and granulated sugar. Whisk together until well combined.
- Add the eggs, one at a time, whisking well after each addition until the mixture is lightened in color and slightly thickened (about 1 minute). This step is key for fudgy brownies.
- Stir in the vanilla extract.
- Combine Dry Ingredients:
- In a separate small bowl, whisk together the unsweetened cocoa powder, all-purpose flour, baking powder, and salt.
- Combine Wet and Dry & Add-ins:
- Gradually add the dry ingredient mixture to the wet ingredient mixture, stirring with a spatula until just combined. Be careful not to overmix; overmixing can lead to cakey brownies instead of fudgy ones.
- If using, gently fold in the chocolate chips or chopped nuts.
- Bake the Brownie Skillet:
- Pour the brownie batter into the prepared skillet or baking dish, spreading it evenly.
- Bake for 25-35 minutes. The baking time will vary depending on your oven and the material/size of your skillet/dish. The brownies are done when a wooden skewer or toothpick inserted into the center comes out with moist crumbs, but not wet batter. The edges should be set, and the center still slightly soft and gooey. Do not overbake for fudginess!
- Cool Slightly and Serve:
- Remove the brownie skillet from the oven. Let it cool for at least 10-15 minutes before serving. This allows it to set up a bit, though it will remain wonderfully warm and gooey.
- Serve individual portions directly from the skillet or scoop onto plates. Top each serving generously with a scoop of vanilla ice cream, fresh berries, and a drizzle of chocolate syrup or caramel sauce if desired.
Tips, Variations, and Storage:
- For Extra Fudginess: Using good quality cocoa powder makes a big difference. Don’t overbake! The key to fudgy brownies is pulling them out when the center is still slightly soft.
- Chocolate Chips: Stirring in chocolate chips (milk, semi-sweet, or dark) makes the brownies even more chocolatey and creates gooey pockets when warm.
- Espresso Powder: Add 1 teaspoon of espresso powder to the dry ingredients to deepen the chocolate flavor without adding a coffee taste.
- Salt Flakes: A sprinkle of flaky sea salt on top of the batter before baking enhances the chocolate flavor.
- Butter vs. Oil: While this recipe uses butter, you can substitute half or all of it with neutral oil for a slightly chewier brownie.
- Different Skillets: If you don’t have a cast-iron skillet, a square or round baking dish (8×8 inch or 9-inch round) will work perfectly. Adjust baking time if your dish is significantly larger or smaller.
- Storage: Store leftover brownie (covered in the skillet or transferred to an airtight container) at room temperature for up to 3-4 days. It can also be frozen for up to 2-3 months.
- Reheating: To enjoy that warm, gooey experience again, reheat individual slices in the microwave for 15-30 seconds, or warm the whole skillet in a low oven (300°F/150°C) for 10-15 minutes.
Pairings:
- Coffee/Espresso: The classic accompaniment for a rich chocolate dessert.
- Milk: A cold glass of milk cuts through the richness beautifully.
- Dessert Wine: A glass of Port or a rich red wine can be a sophisticated pairing.
- Liqueurs: A small shot of Kahlúa, Baileys, or a chocolate liqueur on the side.
Quick Info:
- Prep Time: 10 minutes
- Cook Time: 25-35 minutes
- Total Time: 40-50 minutes
- Servings: 6-8 (depending on portion size)
- Cuisine: American
- Effort Level: Easy